Processing..
Wednesday, December 13, 2017
Friday, November 10, 2017
Wednesday, October 11, 2017
Find SharePoint List Column available via SharePoint Server Side Code
you can use Fields.ContainsField to check if the List Column exists from the custom List, So that, you can avoid error for running Custom Code Webpart.
if(reqReadlist.Fields.ContainsField("RequestID"))
{
LogMessage("RequestID " + Reqitem["RequestID"], EventLogEntryType.Error);
dr["Requisition No"] = Convert.ToString(Reqitem["RequestID"]);
}
else
{
LogMessage("Not Available RequestID ", EventLogEntryType.Error);
}
Tuesday, September 12, 2017
Thursday, August 3, 2017
Tuesday, July 11, 2017
Tuesday, June 13, 2017
Using PowerShell to Get SharePoint Content database size
To get the all CONTENT_DB size in SHAREPOINT server(MB), Using below commands power shell commands.
Get-SPDatabase | Sort-Object disksizerequired -desc | Format-Table Name, @{Label ="Size in MB"; Expression = {$_.disksizerequired/1024/1024}} >c:\Content_DBsize.txt
The above code will export to C drive and you can change drive for your requirement.
Get-SPDatabase | Sort-Object disksizerequired -desc | Format-Table Name, @{Label ="Size in MB"; Expression = {$_.disksizerequired/1024/1024}} >c:\Content_DBsize.txt
The above code will export to C drive and you can change drive for your requirement.
Monday, May 8, 2017
Inherit Subsite Master Page from Parent Master Page in Sharepoint Foundation 2013
Do you want to change the master page setting for just one site, then use the script below:
$web = Get-SPWeb siteurl
$web.MasterUrl = "masterpagerelativeurl"
$web.Update()
$web.Dispose()
The script would be as follows:
$web = Get-SPWeb http://portal/sites/collaboration
$web.MasterUrl = "/sites/collaboration/_catalogs/masterpage/customSeatle.master"
$web.Update()
$web.Dispose()
Refreshing the root site in the browser will show the new master page design, but all sub-sites will still show the old master page design – this is because they are each using a master page stored on their respective site. To change the master page setting for all sites in a site collection, use the following script:
$site = Get-SPSite http://portal/sites/collaboration
$site | Get-SPWeb -limit all | ForEach-Object { $_.MasterUrl = "/sites/collaboration/_catalogs/masterpage/customSeatle.master";$_.Update() }
$site.Dispose()
Note that this will only change existing sites and will not set a custom master page for any new sites created. To update new sites, you will need to either run the script every time a new site is created, or use an alternative approach such as a feature receiver/stapler or Web provisioning event receiver to automatically set the new master page on site creation.
Do you want to revert all team sites in the site collection back to using their own default master page again, then use the following script:
$site = Get-SPSite http://portal/sites/collaboration
$site | Get-SPWeb -limit all | ForEach-Object { $_.MasterUrl = $_.ServerRelativeUrl + "/_catalogs/masterpage/v4.master";$_.Update() }
$site.Dispose()
Friday, April 21, 2017
SharePoint 2013 Foundation – Hide Recent from Left Navigation
The "Recent" section in the left navigation of SharePoint 2013 Foundation is incredibly annoying. In my opinion, it’s something that should be off by default, but we should have a way to enable it as desired through the user interface. Unfortunately, it’s on by default and if we want to turn it off, we can’t. It’s not possible.

Hide “Recent” section on one page
1. Edit the page
2. Add a Content Editor Web Part to the page
3. Paste this code into the Content Editor Web Part, making any changes you need to.
script type="text/javascript">
$(document).ready(function() {
$("#sideNavBox .ms-core-listMenu-item:contains(‘Recent’)").parent().hide();
});
$(document).ready(function() {
$("#sideNavBox .ms-core-listMenu-item:contains(‘Recent’)").parent().hide();
});
4. Save/Check In/Publish the page and you’re done.
Hide “Recent” section on all pages
This assumes that all pages in your site collection are referencing the same master page. Of course if you have multiple master pages and site collections, you’ll need to do this for each master page being used within each site collection.
1. Edit the master page of your site in SharePoint Designer 2013 (other methods work fine as well).
2. Add a reference to jQuery in the HTML section of your master page.
3. Add the jQuery script to hide the “Recent” section within the “PlaceHolderAdditionalPageHead” content placeholder.
script type="text/javascript">
$(document).ready(function() {
$("#sideNavBox .ms-core-listMenu-item:contains(‘Recent’)").parent().hide();
});
$(document).ready(function() {
$("#sideNavBox .ms-core-listMenu-item:contains(‘Recent’)").parent().hide();
});
4. Save/Check In/Publish the master pages and you’re done.
Friday, March 10, 2017
Nintex - the-form-has-controls-that-have-incomplete-property-settings
Delete all existing layout in that task form and publish and export and import workflow to other sites
Wednesday, February 15, 2017
The worklfow name is used elsewhere on this site. Please choose another name in Nintex Workflow
Scenario 1:
I have created a workflow with name “Copy Workflow”.Even after deleted the workflow and started creating new workflow with same name “Copy Workflow” below error is displaying.
Scenario 2:
I have list with workflow name is "test1" then i deleted list and recreated list then trying to import nintex workflow with same name "test1" then the below error is displaying
“The worklfow name is used elsewhere on this site. Please choose another name in Nintex Workflow”
Solution:
There is a hidden list that contains the workflow definition files. You may need to remove the specificfolder (with the workflow name) to remove the workflow completely. If your site ishttp://test01/sites/test/ the url would be http://test01/sites/test/NintexWorkflows/.
Tuesday, February 14, 2017
Add Active Directory Module for Windows Powershell
Add Active Directory Module for Windows Powershell
Open Server Manager and Add role for Windows Powershell


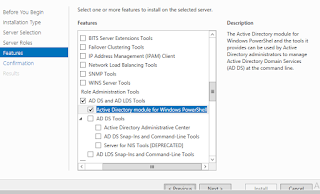
Open Server Manager and Add role for Windows Powershell


Thursday, January 5, 2017
Hide Validation Summary Error Message in the Nintex Form
Issue
By default, Nintex seems to display error messages (required data missing, validation error messages, etc.) above the Nintex form.
Solution:
Add in the following CSS code in the Cusom CSS area and Check it. the error validation summary message is not visible to the user.
@keyframes fadeIn { from {opacity: 0;} to {opacity: 1;}}
.nf-validation-summary
{
visibility: hidden;
position: fixed;
z-index : 1000;
top: 150px;
width: 280px;
left: 15px;
background-color: white;
border: 2px solid red;
border-radius:3px;
box-shadow: 3px 3px 3px 3px rgba(50, 50, 50, 0.6);
animation: fadeIn 1s;
margin-top : 20px;
}
Nintex Confirmation pop up window after validation and Form Submit
Issue:


While I try to submit the Nintex form without filling the mandatory fields, the confirmation dialog is coming and then it is showing the requried field error message.
My requirement is Confirmation dialog should come onclik on "Save" button, once the require field validation gets succeeded and items gets added to the list.
Solution:
Add in the following javascript code in the Custom Javascript area on the settings page then the pop up will appear, once the form will be submitted.
NWF$(document).submit(function () {
if (NWF$('.nf-validation-summary').css('display') == 'none') {
alert("Form Submitted Successfully");
}
else
{
alert("Please Fill all Mandatory fields");
}
});


Change the Position of Validation Summary Error Message in Nintex Form
Issue
By default, Nintex seems to display error messages (required data missing, validation error messages, etc.) above the Nintex form. Since the top of many forms scroll off the screen before the user reaches the "Submit" button (typically at the bottom of the form), the error message is not visible to the user. It would seem to make much more sense to display these messages below the form, where the user can see them when he/she clicks Save/Submit.
Solution:
Add in the following CSS code in the Cusom CSS area and Check it
@keyframes fadeIn { from {opacity: 0;} to {opacity: 1;}}
.nf-validation-summary
{
position: fixed;
z-index : 1000;
top: 150px;
width: 280px;
left: 15px;
background-color: white;
border: 2px solid red;
border-radius:3px;
box-shadow: 3px 3px 3px 3px rgba(50, 50, 50, 0.6);
animation: fadeIn 1s;
margin-top : 20px;
}

Subscribe to:
Posts (Atom)